
This appendix covers interactions between your BeOS and the Mac OS.
You can mount Macintosh HFS (Hierarchical File System) volumes on the Mac OS. This lets you access the files stored on any Macintosh partitions connected to your computer, using BeOS applications.
|
The BeOS does not support mounting HFS+ volumes. If you attempt to mount HFS+ volumes you will most likely corrupt them. (HFS+ is an optional feature of Mac OS System 8.1 and later.) |
Mount and unmounting HFS volumes is a four-step procedure:
You can also mount and unmount disks directly from the File menu in the Disks window. To learn more about this see "Using DriveSetup " in the chapter "Customizing the BeOS ."
DriveSetup is a BeOS utility, located in the /preferences folder, that lets you work with storage devices such as hard disks, floppy disks, removable cartridges, and partitions. Double-click the DriveSetup icon. It tells you that it is "Scanning devices..." to see what volumes and partitions exist. After that, you should see this screen:

Mounting HFS volumes using DriveSetup is virtually the same as mounting BeOS volumes. First select the hard disk to mount by clicking on the device name and highlighting it. If there are any mountable volumes, the Mount menu becomes active.
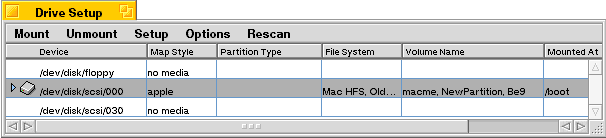
Now select the Mount menu and choose the Apple_HFS volume you want to mount. Alternatively, you could select Mount All Partitions.

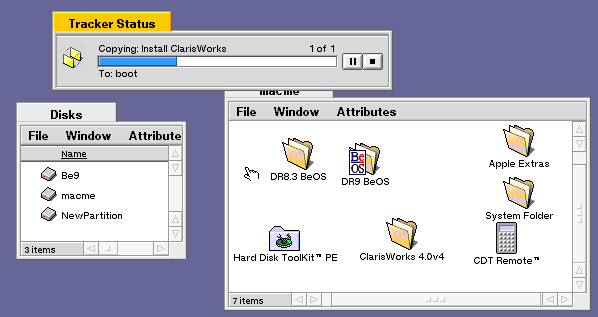
Once you've mounted the HFS volume it appears within your Disks folder.

You can't run the Macintosh applications, but you now have access to all the data files stored on the HFS volume. To copy files from one volume to another, click on a file and drag it to a window on a different volume.
When you finish using an HFS volume, you can unmount it, although it will be unmounted automatically when you restart or shut down the BeOS.
To unmount a volume, launch DriveSetup and select the drive where the volume resides. From within the Unmount menu, select the volume to unmount.

Converting Macintosh TrueType fonts for use on the Be OS is a simple two-step process:
When you install the BeOS, a folder called Macintosh Utilities is created on the Macintosh volume. This folder contains a utility called TTConverter, which converts Macintosh TrueType fonts into a format that the BeOS can use. Most TrueType fonts can be converted using this utility with the exception of Apple's standard fonts that ship with the Mac OS (Chicago, Courier, Geneva, Helvetica, Monaco, New York, Palatino, Symbol, and Times).
 |
The BeOS uses the same TrueType format as Microsoft Windows. If you acquire new Macintosh fonts, get them in TrueType format, or convert them with the TTConverter. |
Look for the TTConverter in the BeOS Mac Tools/Mac Utilities folder, then follow these steps to convert TrueType fonts for use with the BeOS:
1. Double-click on the TTConverter icon and select Convert from the File menu.
2. A dialog let you choose the font you wish to convert (e.g., Arial).
:

3. You can convert all of the font types associated with a font. An additional dialog lets you either save them all or skip font styles you don't need. Converted files have a filename that ends in .TTF (e.g., ARIAL.TTF, ARIALB.TTF, ARIALI.TTF, ARIALBI.TTF).

After you convert the fonts, you can copy them over to your BeOS volume, by mounting the HFS volume (see "26998: head1: Mounting HFS Volumes" in this chapter) or by using the File Transfer Protocol (FTP). In any case, the .TTF files must be placed in /boot/home/config/fonts/ttfonts folder. Once they are there, restart the BeOS to activate the new fonts, or use the Fonts preferences panel. You can now use the StyledEdit application to see your fonts.

Since the BeOS installs on Power Mac-compatible hardware, the environment in which it runs will most likely contain other computers running the Mac OS. The BeOS installation CD includes a Mac OS tool called Netfinder, which lets you transfer files using the Internet's File Transfer Protocol (FTP).
Netfinder is shareware. The documentation that accompanies Netfinder contains detailed technical information as well as the shareware usage license.
File transfer from the BeOS to networked Mac OS hosts involves three steps:
When setting up the Mac OS for Internet file sharing using the TCP/IP control panel, you should refer to your Mac OS documentation for help. You can also refer to the chapter "Connecting to the Internet With BeOS." You'll find the concepts, steps, and basic definitions are very similar. If you're not connected to the Internet but still want to set up a connection using the Internet protocols, read "Setting Up BeOS for Both Stand Alone Network and Modem-Based Internet Use" in the same chapter.
Your BeOS system includes a built-in FTP server for serving files to hosts on a TCP/IP network. To turn on Internet file sharing:
1. Open the Network preferences panel.
2. Check the Enable FTP server checkbox, and assign a user and password.
3. Save your changes and click the Restart Networking button.
You are now ready to transfer files.

Netfinder for Mac OS is included on the BeOS CD. To run this application, double-click its icon. Type in the IP address of the BeOS machine to which you wish to connect in the Host field. Enter the user name and password in the appropriate areas. Also be sure to put the "/" in the Path field, which opens your connection at the root of the volume, making navigation of the remote file system much easier. Click the Connect button to activate your connection.

Once connected, you'll see a window with the contents of the volume of the BeOS system. You may now drag and drop files between your Mac OS volumes and the BeOS volume to which you are connected.

The Be User's Guide, in lovely HTML, for BeOS Release 3.
Copyright © 1998 Be, Inc. All rights reserved.
Last modified February 19, 1998.